

You know those things that everyone tells you not to do, but you think, “It won’t be like that for me!” and you do it anyway. Like, when your parents tell you not to get a dog. They tell you, “It’s a lot of responsibility,” “It’s like having a child,” “You won’t be able to travel as easily anymore!” But you do it anyway because you want the dog and you figure they don’t really know what they’re talking about. And then you realize that having a dog is all the things they said! Responsibility. Disciplining. Cleaning up. Tied to the house.
Dangit! If only you’d listened!
The same thing happened with our kitchen cabinet project. Everything I read said things like “Painting cabinets is not a DIY project for the faint of heart!” and “Only truly dedicated DIY’ers (and gluttons for punishment) take on the task of painting their own kitchen cabinets.” And, in fact, even my husband suggested we hire this project out, but I was adamant.
“We can do it!”
“I’ll make it my own personal project!”
“My sister painted her kitchen cabinets and she said it wasn’t bad!” (note: I am now certain my sister is much tougher than I am).
 And, so that’s how I ended up with the absolute WORST project of all time, one for which I am STILL kicking myself for taking on.
You may remember that our cabinets started out brown with a gold, textured center panel. Here’s an image to remind you of what we were working with!
We easily removed all the cabinet doors and hardware.
Then I spent 5 hours at the house one night, sanding down the base of the cabinets. To which I later found out that when my husband said, “It needs to be sanded,” he did NOT mean for it to be sanded all the way down to raw wood. It just needed to be, “roughed up.” I won’t go into detail about how angry I was when I found out I’d basically wasted half a day of work. At least they looked pretty!
My friends, Rachel and Katie, helped paint the cabinet bases with two coats of white primer paint, and a final coat of glossy white.

And then I also roped, my husband Lucas, Katie, and her husband Phil into helping prep the cabinet doors. Since the textured center panel wouldn’t sand down, we had to use a semi-paste chemical stripper, which turned the cabinet doors a nice shade of green, but made the gold texture come off (fairly) easily. Praise Jesus.
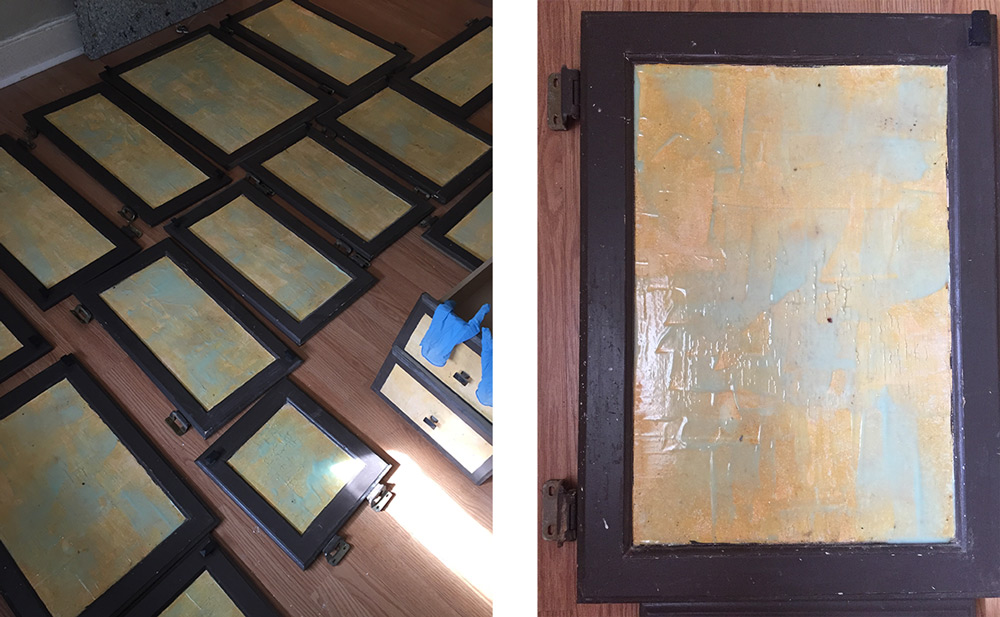
Then, we sanded the rest of the doors, wiped them down, laid them out, and painted two coats of primer on both sides, and all edges. This required multiple days, and more help (thank you, Sarah and Ryan!) because there was limited, and you had to wait for one side to dry before you could do the other.
FINALLY, we got to paint the final coat of glossy paint on the cabinet doors, but we weren’t done yet. The old hardware on the doors had been painted brown. So, we needed to remove that paint by soaking them in a liquid paint stripper, brushing them with a toothbrush, and then spray painting the black color we want (truth be told, this is not yet done. I will be finishing up the hardware prep this evening. How’s that for a fun Friday night?!)
Here’s the deal. This project has taken FOREVER. I know I’m being a little dramatic, but the hard truth is this: The amount of time it’s taken has pushed us past our deadline for completing our renovation work. So, we’ve had to pay a month’s mortgage on the place.
Looking back, I wish we had instead paid someone to handle the cabinets, and gotten the project done sooner, so we could get a renter in, and not have to pay the extra month’s mortgage.
You live and you learn, I guess. And yes, my dear husband, you’ve earned your right to say: “I told you so!”
Stay up to date with this column so you can see the final product. Sign up here.


0 Comments